> ## Documentation Index
> Fetch the complete documentation index at: https://www.krea.ai/docs/llms.txt
> Use this file to discover all available pages before exploring further.
# Domain Verification & Capture
> Verify ownership of your email domain in Krea to enable Domain Capture, auto-enroll team members, and unlock SAML SSO for your enterprise workspace.
Domain verification proves that your organization owns the email domain used by your team members. This is a prerequisite for enabling SAML Single Sign-On (SSO) and other enterprise security features.
Domain verification is required before you can configure SAML SSO. Complete these steps first, then proceed to [SAML SSO Setup](/user-guide/help-and-support/saml-sso-setup).
Verified domains default to **Enforced (Auto-Enroll)** for [Domain Capture](#configure-domain-capture), meaning users with matching email addresses will be automatically added to your workspace on their next login. Review the capture mode immediately after verifying your domain.
## Prerequisites
You must be a **workspace owner** or **admin**
Access to your organization's DNS settings (Cloudflare, Route 53, GoDaddy, etc.)
## Why Verify Your Domain?
Domain verification ensures that only authorized administrators can:
* Configure Domain Capture to automatically invite or enroll users with your domain
* Enable SAML SSO for users with your company email domain
* Manage authentication settings for your organization
* Control how team members access your Krea workspace
## Step 1: Add Your Domain
Navigate to [Workspace Settings ↗](https://www.krea.ai/settings/workspace-settings).
You can also click your **workspace avatar** in the bottom-left corner of the sidebar, then select **Settings**.
Scroll down to the **Domain Management** section.
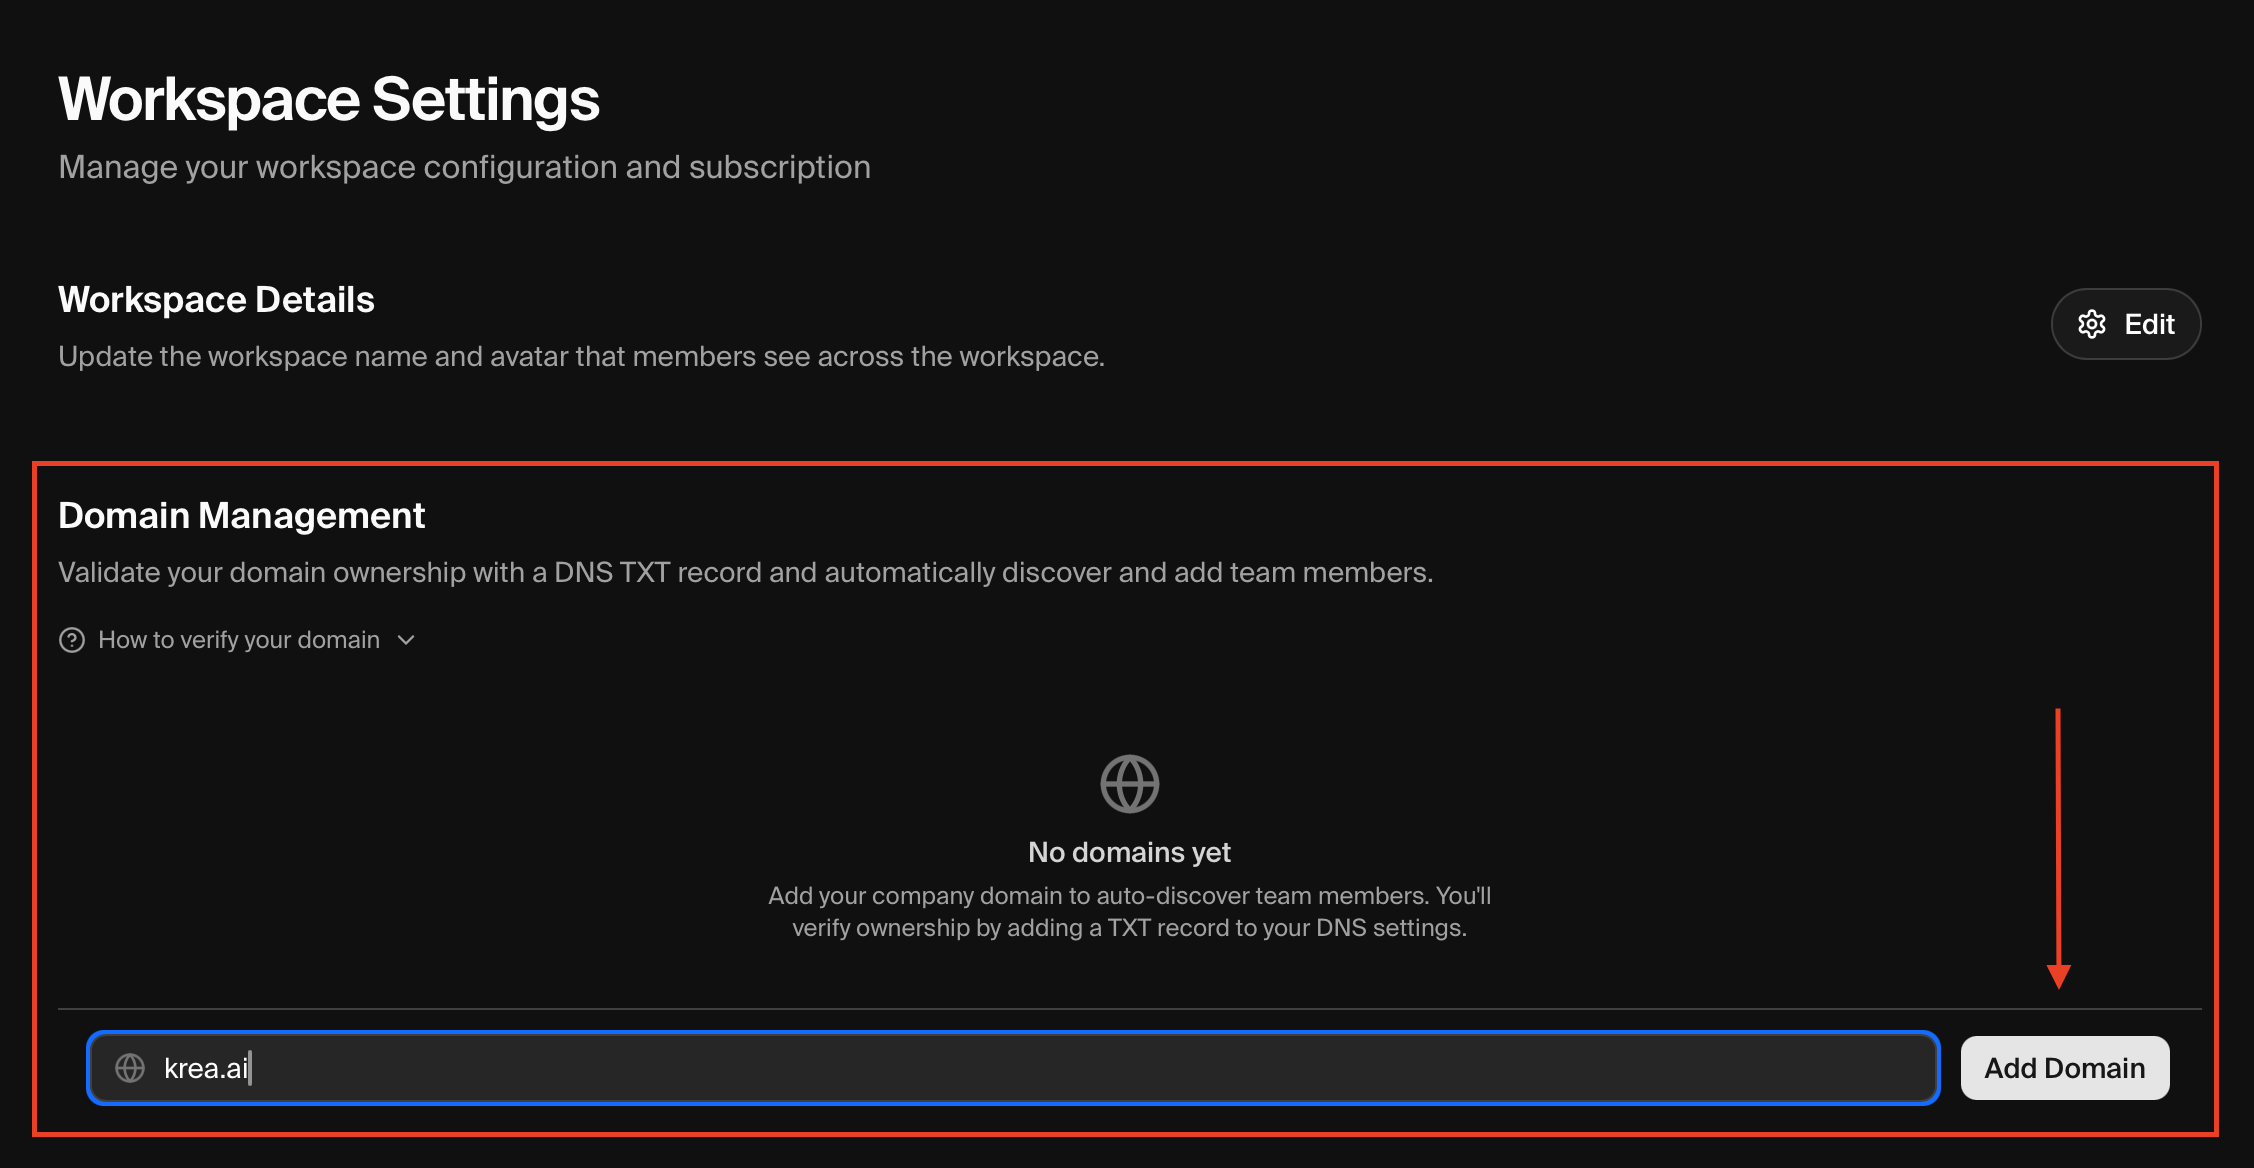
Type your company's email domain (e.g., `acme.com`) in the input field and click **Add Domain**.
Use the domain portion of your employees' email addresses. For example, if employees use `user@acme.com`, enter `acme.com`.
## Step 2: Add DNS TXT Record
After adding your domain, Krea displays a verification token. Your domain will show as **Pending** until verified.
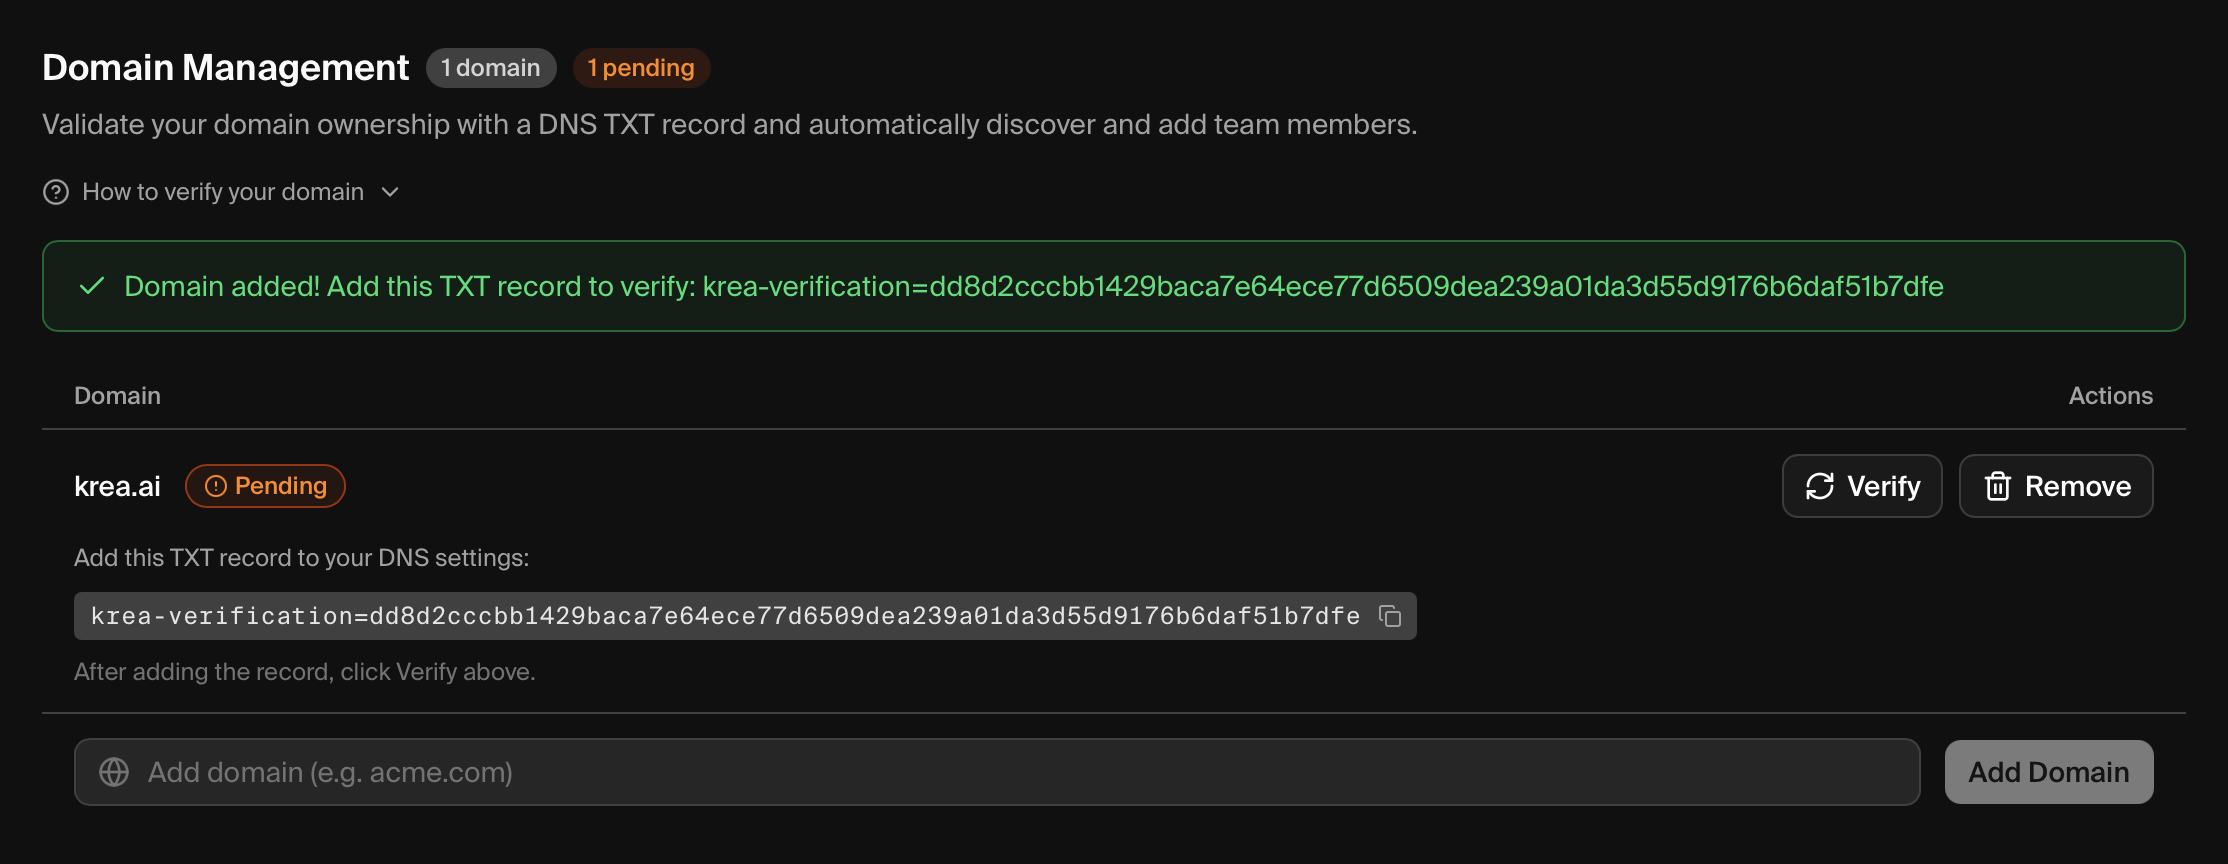
You'll see:
* A success alert with the **verification token** (starting with `krea-verification=`)
* Your domain listed with a **Pending** status
* A copyable TXT record value
**Copy the token exactly** — including any special characters. Even a small typo will cause verification to fail.
### DNS Record Details
| Field | Value |
| ------------- | ---------------------------------------------------- |
| Type | `TXT` |
| Host/Name | `@` (or leave blank, depending on your DNS provider) |
| Content/Value | The verification token shown in the modal |
| TTL | `3600` (1 hour) or your provider's default |
### Adding the Record by Provider
1. Log in to [Cloudflare Dashboard](https://dash.cloudflare.com)
2. Select your domain
3. Click **DNS** in the left sidebar
4. Click **Add record**
5. Set Type to `TXT`, Name to `@`, and paste the token in Content
6. Click **Save**
Reference: [Cloudflare DNS Documentation ↗](https://developers.cloudflare.com/dns/manage-dns-records/how-to/create-dns-records/)
1. Open the [Route 53 Console](https://console.aws.amazon.com/route53)
2. Click **Hosted zones** → Select your domain
3. Click **Create record**
4. Leave Record name empty, set Type to `TXT`
5. Paste the token in Value (with quotes)
6. Click **Create records**
Reference: [AWS Route 53 Documentation ↗](https://docs.aws.amazon.com/Route53/latest/DeveloperGuide/resource-record-sets-creating.html)
1. Log in to [GoDaddy](https://godaddy.com) → **My Products**
2. Find your domain → Click **DNS**
3. Click **Add** under Records
4. Select Type `TXT`, Host `@`, paste token in TXT Value
5. Click **Save**
Reference: [GoDaddy Help - Add a TXT Record ↗](https://www.godaddy.com/help/add-a-txt-record-19232)
1. Log in to [Namecheap](https://namecheap.com) → **Domain List**
2. Click **Manage** next to your domain
3. Go to **Advanced DNS** tab
4. Click **Add New Record**
5. Select `TXT Record`, Host `@`, paste token in Value
6. Click **Save All Changes**
Reference: [Namecheap Knowledge Base - TXT Records ↗](https://www.namecheap.com/support/knowledgebase/article.aspx/317/2237/how-do-i-add-txtspfdkimdmarc-records-for-my-domain/)
1. Log in to [Google Domains](https://domains.google.com)
2. Select your domain
3. Click **DNS** in the left menu
4. Scroll to **Custom records** → Click **Manage custom records**
5. Click **Create new record**
6. Set Type to `TXT`, Host name to `@`, paste the token in Data
7. Click **Save**
Reference: [Google Workspace Admin Help - TXT Records ↗](https://support.google.com/a/answer/2716800)
1. Log in to your DNS provider's dashboard
2. Navigate to DNS settings for your domain
3. Add a new TXT record
4. Set the host/name to `@` (or leave blank)
5. Paste the verification token as the value
6. Save your changes
## Step 3: Verify Your Domain
Go back to the verification modal in Krea.
Click the **Verify Domain** button.
Krea will check your DNS records. Once verified, you'll see a success message.
**DNS propagation** can take anywhere from a few minutes to 72 hours. If verification fails, wait 5-10 minutes and try again.
## Configure Domain Capture
Domain Capture controls what happens when a user with a matching verified email domain signs in to Krea. You can automatically add them to your workspace, prompt them to join, or take no action.
### Capture Modes
| Mode | Label in Settings | Behavior |
| ------------ | ------------------- | ----------------------------------------------------------------------------------------------------------------------------------------------------------- |
| **Off** | Disabled | Users join only via direct admin invitation. |
| **Optional** | Auto-Invite Enabled | Users see a "Join Your Verified Workspace" modal. They can accept or dismiss it (re-prompted after 1 week). |
| **Enforced** | Auto-Enroll Enabled | Users are automatically added to your workspace on next login. Their active workspace switches automatically and they see a confirmation modal. No opt-out. |
**Default behavior:** Newly verified domains default to **Enforced (Auto-Enroll)**, meaning users with matching email domains will be automatically added to your workspace. Review and adjust the capture mode immediately after verifying a domain if this is not your desired behavior.
### Setting the Capture Mode
Navigate to [Workspace Settings ↗](https://www.krea.ai/settings/workspace-settings) and scroll to the **Domain Management** section.
Find the domain you verified. Note that it defaults to **Enforced (Auto-Enroll)** immediately after verification.
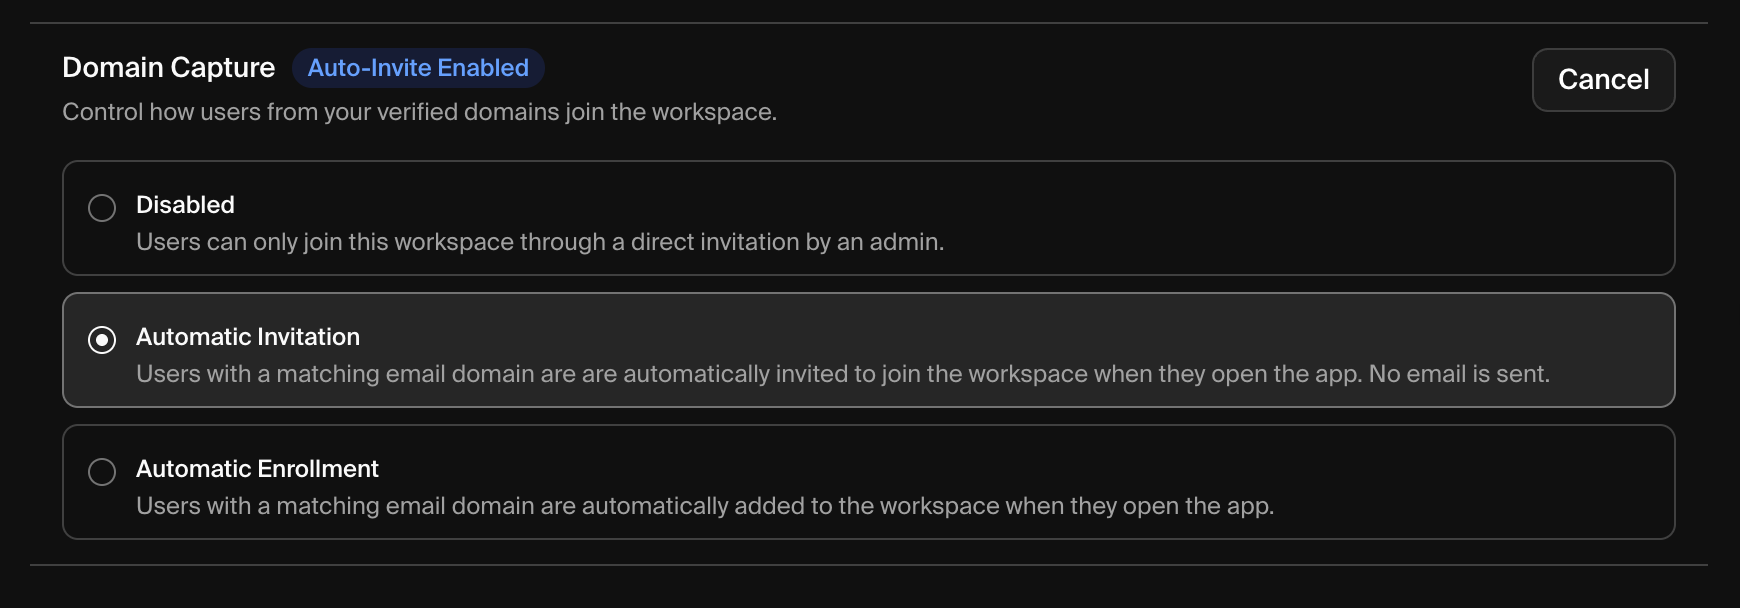
Use the radio buttons to choose **Off**, **Optional (Auto-Invite)**, or **Enforced (Auto-Enroll)**. Your selection is saved automatically.
### Key Details
Multiple workspaces can verify the same email domain. Each workspace manages its own capture mode independently. A user matching multiple workspaces may be enrolled or prompted for each one.
Users who are already members of your workspace are not affected by Domain Capture. No duplicate invitations or enrollment actions occur.
## Troubleshooting
* **Wait for propagation** — DNS changes can take up to 72 hours (usually under 1 hour)
* **Verify your record** — Use [MXToolbox TXT Lookup](https://mxtoolbox.com/TXTLookup.aspx) to check if the record is visible
* **Check for typos** — Ensure the verification token is copied exactly
* **Check the host field** — Some providers want `@`, others want it blank, and some want your domain name
* **Check for duplicate records** — Remove any old or duplicate TXT records
* **Verify the exact value** — Some providers add quotes automatically; don't add extra quotes
* **Try a different TTL** — Lower TTL values (300 seconds) propagate faster
Contact your IT administrator or the person who manages your organization's domain. They'll need to add the TXT record for you.
## Next Steps
Once your domain is verified and Domain Capture is configured, you can proceed to set up SAML SSO for centralized authentication:
Configure Single Sign-On for your Krea Enterprise workspace